Tag: military history

  • First Battle of Ypres: How the ‘Race to the Sea’ Forged the Trenches

    First Battle of Ypres: How the ‘Race to the Sea’ Forged the Trenches

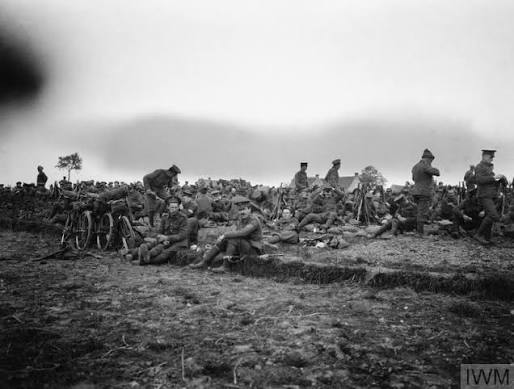
    In the autumn of 1914, the Great War was still a war of movement. Armies marched, cavalry charged, and generals dreamed of decisive victories. But by the time the leaves fell in Flanders, that dream was dying. The First Battle of Ypres, fought from October 19 to November 22, 1914, was the last great open-field battle of the war—and the one that slammed the door on mobility. It marked the end of the ‘Race to the Sea’ and the beginning of the trenches that would define the next four years.

    This battle was not just another clash. It was a brutal lesson in the cost of outdated tactics against modern firepower, a fight that bled the British Expeditionary Force white, and a German failure that turned into a national tragedy. Understanding Ypres means understanding how the Western Front froze into stalemate, and why the names of places like Langemarck and Gheluvelt still echo in military history.

    The Race That Ended at the Coast

    After the Battle of the Marne in September 1914, the German advance on Paris was halted. Both sides then tried to outflank each other to the north, in a series of maneuvers that became known as the ‘Race to the Sea.’ Each attempt simply extended the front line westward, until by mid-October it ran from the Swiss border to the North Sea. The only gap left was around the Belgian city of Ypres.

    The Germans wanted to break through to the Channel ports—Calais and Dunkirk—to cut off British supply lines and potentially knock Britain out of the war. The British, with their small but professional expeditionary force, were determined to hold Ypres and keep those ports safe. Both sides rushed troops to the area, and by October 19, the stage was set for a collision.

    The Old Contemptibles’ Last Stand

    The British Expeditionary Force (BEF) was a force unlike any other. It was small—roughly 100,000 to 160,000 men—but it was a professional army, with well-trained regulars who could fire an astonishing 15 aimed shots per minute, a skill known as the ‘mad minute.’ These veterans, later nicknamed the ‘Old Contemptibles’ after a (likely apocryphal) order from Kaiser Wilhelm II calling them a ‘contemptible little army,’ were about to face a German force that vastly outnumbered them.

    The German Fourth and Sixth Armies, commanded by Albrecht, Duke of Württemberg, and directed by Chief of Staff Erich von Falkenhayn, launched repeated assaults against the Ypres salient—a bulge in the Allied line. The fighting was intense from the start. At Langemarck (October 21–24), the Germans threw in reserve corps made up of young, poorly trained volunteers and older reservists. These inexperienced troops advanced in dense formations, singing patriotic songs, and were mown down by the British rifles. The slaughter was so appalling that the battle became known in Germany as the ‘Kindermord bei Ypern’—the Massacre of the Innocents at Ypres.

    The Crisis at Gheluvelt

    The most critical moment came on October 31, at the village of Gheluvelt. The German assault had broken through the British line, and the situation was desperate. The British I Corps, commanded by Douglas Haig, was on the verge of collapse. In a famous counterattack, Haig threw in the 2nd Worcestershire Regiment, which recaptured the village and steadied the line. This action is often credited with saving the entire Ypres salient from being overrun.

    But the cost was staggering. By the end of the battle, the BEF had suffered approximately 54,000 to 58,000 casualties. The pre-war regular army was effectively destroyed. Many of its best officers and men were killed or wounded, replaced by reservists and raw recruits who would never match their skill. The term ‘Old Contemptibles’ became a badge of honor for those who survived, but also a reminder of what had been lost.

    The German Tragedy at Langemarck

    While the British remember Ypres as a heroic last stand, the German memory is darker. The battle became a national trauma, centered on the image of young, idealistic volunteers marching to their deaths. The ‘Kindermord’ was later used both to glorify sacrifice and to criticize the military leadership. Falkenhayn’s decision to commit these inexperienced reserve corps to frontal assaults was widely condemned as wasteful and tactically inept.

    German casualties at Ypres are harder to pin down, with estimates ranging from 20,000 to 46,000, but the psychological impact was immense. The loss of so many young men, many of them students and graduates who had volunteered with patriotic fervor, left a scar on German society. The battle also revealed that the German army, despite its numerical superiority, could not break the Allied line. The offensive was called off in mid-November, and both sides, exhausted and soaked by autumn rains, began to dig in for the winter.

    The Birth of Trench Warfare

    The First Battle of Ypres was a transitional battle. Armies still used Napoleonic-era tactics—massed infantry assaults, cavalry in reserve—against modern weapons like machine guns, rapid-fire artillery, and magazine rifles. The result was catastrophic casualties. The battle proved, in blood, that frontal infantry attacks against prepared positions were suicidal. Yet the lesson would have to be relearned painfully over the next four years.

    By the end of November, the front line had stabilized. The Ypres Salient, a bulge in the Allied line around the city, would remain a focal point of fighting for the rest of the war. The trenches that began as shallow ditches would grow into vast networks of earthworks, barbed wire, and bunkers, stretching from the North Sea to the Swiss border. The war of movement was over; the war of attrition had begun.

    The Role of the French and the Wider Picture

    The French played a significant role in the battle, particularly in the southern part of the salient. General Ferdinand Foch, coordinating Allied efforts in the north, launched aggressive counterattacks that were crucial in holding the line. However, French casualties—estimated between 10,000 and 50,000—are often overshadowed in English-language accounts. The French were also focused on their own offensives in Artois and Champagne, which limited their support at Ypres.

    The battle’s strategic significance cannot be overstated. The Germans failed to reach the Channel ports, and the Allies maintained a foothold in Belgium. But the cost was immense. The BEF, once a small but elite force, was never the same. The war would go on for four more years, and the trenches of Ypres would witness some of the bloodiest battles in history, including the Second and Third Battles of Ypres (Passchendaele). The First Battle of Ypres was not just a battle; it was the birth of a new kind of warfare, one that would consume a generation.

    The First Battle of Ypres ended in mud and exhaustion, with no clear winner. But its legacy is profound. It marked the end of the war of movement and the beginning of trench warfare, a brutal stalemate that would define the Western Front for years to come. The ‘Old Contemptibles’ held the line, but at a terrible price, and the German ‘Kindermord’ left a scar that would haunt Germany. As the guns fell silent in November 1914, the soldiers on both sides could not have known that they were digging the graves of millions, and that the trenches they carved into the Flanders mud would become the symbol of a generation lost.

    Summary

    • The First Battle of Ypres (Oct 19–Nov 22, 1914) was the final battle of the ‘Race to the Sea’ and the beginning of trench warfare.
    • The British Expeditionary Force, despite being outnumbered, held the Ypres salient against German assaults, but suffered ~54,000–58,000 casualties, effectively destroying the pre-war regular army.
    • Key engagements included Langemarck, Gheluvelt, and Nonne Bosschen, where German reserve corps of young volunteers were decimated, leading to the ‘Kindermord’ myth.
    • The battle ended in a stalemate, with both sides digging in for the winter, creating the trenches that would define the war.
    • The French played a crucial role, but their efforts are often overlooked in English-language accounts.

    FAQ

    Q: Why is it called the ‘Race to the Sea’?
    A: After the Battle of the Marne, both the Allies and Germans tried to outflank each other to the north, racing toward the North Sea. Each attempt extended the front line, until it reached the coast. The ‘race’ ended at Ypres, where the last gap was closed.

    Q: Who were the ‘Old Contemptibles’?
    A: The British Expeditionary Force, a small professional army, was reportedly called a ‘contemptible little army’ by Kaiser Wilhelm II. The soldiers adopted the name proudly. They were highly skilled regulars who suffered devastating losses at Ypres.

    Q: What was the ‘Kindermord bei Ypern’?
    A: It means ‘Massacre of the Innocents at Ypres.’ It refers to the slaughter of young, inexperienced German volunteer soldiers at Langemarck, who advanced in dense formations and were mown down by British rifle fire. The event became a tragic national myth in Germany.

    Q: How many casualties were there?
    A: British casualties were approximately 54,000–58,000. German casualties are estimated between 20,000 and 46,000, and French casualties between 10,000 and 50,000, though figures vary widely.

    Q: Why was the battle important?
    A: It marked the end of mobile warfare and the beginning of trench warfare on the Western Front. The failure of frontal attacks against modern weapons at Ypres foreshadowed the costly tactics of the rest of the war.
  • Passchendaele: The Battle Where Men Drowned in Mud

    Passchendaele: The Battle Where Men Drowned in Mud

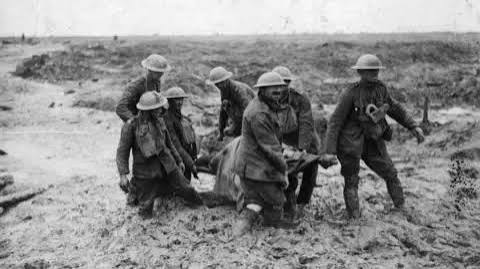
    The Third Battle of Ypres, known to history as Passchendaele, lasted 103 days and produced one of the most haunting images of the First World War: soldiers, horses, and even entire guns sinking into a sea of mud. The battle was fought over a few kilometers of Belgian farmland that became a swamp, and its name is now synonymous with the brutality and futility of trench warfare.

    But Passchendaele was not just a meaningless slaughter—it was a calculated, if flawed, strategic gamble. The British commander, Sir Douglas Haig, believed he could break the German line and relieve pressure on the exhausted French army. Instead, the offensive became a brutal war of attrition, costing hundreds of thousands of casualties for a strip of ground that would be abandoned in the German spring offensives of 1918.

    This article explores the facts, the mud, and the human cost of Passchendaele, and asks why the battle remains a symbol of the Great War’s tragedy.

    A Salient That Became a Trap

    The battle was fought around the Ypres Salient, a bulge in the Allied line that had been held since 1914. The town of Ypres was a symbol of Belgian resistance, but it was surrounded on three sides by German-held ridges. The most important of these was Passchendaele Ridge, a low rise that gave the Germans perfect observation over the British positions.

    For two years, the Allies had tried to break out of the salient, but every attack was met with devastating German fire. Haig’s plan in 1917 was to capture the ridge and then push on to the Belgian coast, where German submarine bases at Zeebrugge and Ostend were strangling Britain’s supply lines. He also needed to keep the Germans busy while the French recovered from a series of mutinies that had left their army in disarray.

    The Artillery That Destroyed the Ground

    The offensive began with a massive artillery bombardment. Over 4.25 million shells were fired in ten days, more than in any previous battle. The idea was to destroy German barbed wire, trenches, and gun positions, and to allow the infantry to advance with minimal opposition.

    But the bombardment had a devastating side effect. The area around Ypres was reclaimed marshland, drained by a network of ditches and pumps. The shells tore up the drainage system and churned the clay soil into a waterlogged moonscape. Every shell hole became a potential death trap, filling with water and mud. When the infantry attacked on 31 July 1917, they found the ground already turning to sludge.

    The weather made things worse. August 1917 was the wettest in thirty years. Rain began on the first day of the battle and continued almost without letup. The mud became so deep that men and animals drowned in shell holes. Rifles jammed, artillery pieces sank, and wounded soldiers were lost in the mire.

    The Phases of the Battle

    The battle was not one continuous push but a series of separate engagements, each with its own name and its own tragedy.

    Pilckem Ridge and Langemarck: The Hopes and the Rain

    The opening attack, the Battle of Pilckem Ridge (31 July – 2 August), made some initial gains. British, French, and Belgian troops advanced up to 1.8 kilometers in places, capturing German positions and taking thousands of prisoners. But German counterattacks, combined with the rain, halted the advance.

    The Battle of Langemarck (16–18 August) was a follow-up attempt. It achieved little, and the mud was already slowing movement and making artillery support unreliable. The infantry struggled to keep up with the creeping barrage, and many attacks failed in the morass.

    Plumer’s ‘Bite and Hold’: A Brief Success

    In September, Haig handed command of the main effort to General Herbert Plumer, who adopted a different tactic: ‘bite and hold.’ Instead of trying to break through, the Allies would advance in small, well-supported steps, each one capturing a limited objective and then digging in to repel counterattacks.

    This approach worked. At the Battle of Menin Road (20–25 September) and Polygon Wood (26 September – 3 October), the Allies gained ground with relatively low casualties. The Battle of Broodseinde (4 October) was the most successful day of the entire offensive: Australian and New Zealand troops overran German positions and captured the ridge’s crest.

    But then the rain returned with a vengeance. The low ground turned into a quagmire, and the next attacks bogged down.

    The Mud at Poelcappelle and Passchendaele

    The Battle of Poelcappelle (9 October) was a disaster. The infantry could barely move, and many men fell into shell holes and drowned. The First Battle of Passchendaele (12 October) was fought by the ANZACs, who suffered heavy casualties for no gain. The mud was so deep that the wounded could not be evacuated, and many died where they lay.

    The Canadian Corps, under Lieutenant-General Arthur Currie, was brought in for the final push. Currie had initially opposed the attack, calling it ‘not a matter of military skill but of pure endurance.’ But he obeyed orders. The Second Battle of Passchendaele (26 October – 10 November) was a series of bloody, step-by-step advances. On 6 November, Canadian troops finally captured the ruined village of Passchendaele. The ridge was in Allied hands.

    The Cost of the Ridge

    By the time the battle ended on 10 November, the Allies had gained about eight kilometers of ground. The cost was staggering: between 275,000 and 325,000 Allied casualties (killed, wounded, or missing). German casualties are harder to estimate, but they were likely between 220,000 and 260,000, with some sources suggesting as many as 400,000.

    In some sectors, the ground gained was measured in yards. The official British history calculated that the offensive cost about one man per square yard of ground taken. The village of Passchendaele, which had been the objective, was a pile of rubble. The ridge was captured, but it was a hollow prize: the Germans simply withdrew to a new defensive line, and the ground was abandoned in 1918.

    The Generals and the Men

    The battle raised questions that are still debated today. Haig argued that it was necessary to wear down the German army and prevent a collapse of the Allied war effort. He believed the Germans were near exhaustion. But his critics, including Prime Minister David Lloyd George, called it a reckless gamble. Lloyd George later wrote that the battle was ‘a reckless gamble’ that could have been avoided.

    The German perspective was different. They adopted a defense-in-depth strategy, using concrete pillboxes and counterattack divisions to inflict maximum casualties on the Allies. They, too, suffered heavily, but they could afford it less. Ludendorff later wrote that the battle ‘placed the German army under a strain from which it never recovered.’

    For the men who fought, the mud was the enemy. One soldier wrote: ‘The mud is not just mud—it is a living thing that grips you, pulls you down, and swallows you.’ The battle became a byword for the horror of the Western Front.

    The Legacy of Passchendaele

    Passchendaele did not win the war. It did not break the German line, and it did not capture the submarine bases. It was a tactical success, in that the Allies held the ground they had gained, but it was a strategic failure. The German army was damaged, but it was not destroyed, and the war would drag on for another year.

    Yet the battle had a profound effect on the course of the war. It forced the Germans to commit reserves that they could not replace. It also demonstrated the limits of attrition as a strategy. And it gave the world a new symbol of the futility of war: the image of a soldier sinking into the mud, unable to move, waiting for death.

    The battle is remembered today through the Menin Gate Memorial in Ypres, which bears the names of 54,000 missing British and Commonwealth soldiers. Every night at 8 p.m., the Last Post is sounded under the arch, a ceremony that has taken place almost without interruption since 1928. The names on the gate are a reminder of the cost of the battle, and of the folly of war.

    In the end, the ground gained at Passchendaele was given back in 1918. But the men who died there are not forgotten. Their sacrifice, like the mud, remains a part of the landscape.

    Passchendaele is a lesson in the limits of military power. It shows what happens when ambition outruns the terrain, the weather, and the endurance of soldiers. The battle was not just a defeat or a victory—it was a tragedy that consumed hundreds of thousands of lives for a few kilometers of mud. And yet, it was also a testament to the courage of the men who fought, and to the resilience of the human spirit in the face of unimaginable horror. The memory of Passchendaele should serve as a warning, not just about war, but about the dangers of pursuing an objective at any cost.

    Summary

    • Dates and Duration: The Third Battle of Ypres lasted from 31 July to 10 November 1917, a total of 103 days.
    • Casualties: Allied casualties were between 275,000 and 325,000; German casualties were between 220,000 and 260,000.
    • Terrain: The battle was fought over reclaimed marshland that was destroyed by artillery and rain, turning into a swamp.
    • Key Tactics: The ‘bite and hold’ tactics under General Plumer were initially successful, but the rain and mud made later attacks impossible.
    • Outcome: The Allies captured Passchendaele Ridge, but the gain was small and was abandoned in 1918. The battle is remembered as a symbol of the futility of trench warfare.

    FAQ

    Q: Why is the battle called ‘Passchendaele’?
    A: The battle is named after the village of Passchendaele, which was the final objective. The village was on a ridge that gave the Allies a vantage point over the German lines. The name became synonymous with the battle and its horrors.

    Q: How many people died at Passchendaele?
    A: Estimates vary, but the total number of casualties (killed, wounded, and missing) for both sides is around 500,000 to 600,000. The exact number is difficult to determine due to the nature of the fighting and the mud.

    Q: What was the ‘bite and hold’ tactic?
    A: This was a tactic used by General Plumer in September 1917. Instead of a full breakthrough, the Allies would advance in small steps, capture a limited objective, and then dig in and defend it against German counterattacks. This was initially successful, but the rain and mud made it impossible to maintain.

    Q: Did the battle have any strategic impact?
    A: The battle did not achieve its main objectives of breaking the German line or capturing the submarine bases. It did, however, inflict heavy casualties on the German army and forced them to use reserves. Some historians argue that it contributed to the eventual Allied victory in 1918.

    Q: What is the Menin Gate?
    A: The Menin Gate is a memorial in Ypres, Belgium, that commemorates the missing British and Commonwealth soldiers who died in the Ypres Salient. It lists over 54,000 names. The Last Post is played there every evening as a tribute.

  • The Great Emu War: When Australia’s Military Lost to Birds and Changed Wildlife Policy

    Emu War | Australia, Casualties, History, Summary, & Facts | Britannica

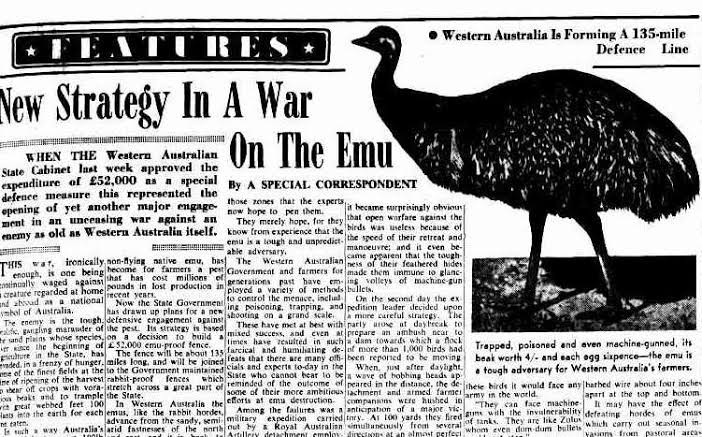
    In late 1932, the Australian military deployed soldiers armed with machine guns to cull emus in Western Australia. The operation, dubbed the ‘Emu War’ by the press, ended in a humiliating retreat after firing 10,000 rounds and killing fewer than 1,000 birds. But beyond the comedy, this bizarre episode reshaped how Australia manages wildlife and exposed the limits of military solutions to ecological problems.

    The story begins with a desperate farming community, a government eager to appear responsive, and an enemy that refused to follow the rules of engagement. The emus—fast, erratic, and resilient—turned a straightforward cull into a national joke. Yet, the lessons from that defeat echo in modern conservation policy, where ecological understanding has replaced trigger-happy solutions.

    The Legacy: More Than a Joke

    Today, the Great Emu War is remembered as a humorous footnote in history, but its implications are serious. It demonstrated the limits of top-down, military-style solutions to wildlife conflicts and influenced a more nuanced approach to conservation. The event also underscored the tension between federal and state responsibilities for agriculture and wildlife—a debate that continues in Australia and beyond.

    As climate change and land-use changes bring humans and wildlife into new conflicts, the lessons from 1932 remain relevant: effective management requires understanding the species, the ecosystem, and the human context, not just firepower.

    The Great Emu War was a military defeat but a policy victory—it taught Australia that you cannot shoot your way out of an ecological problem. The emus, in their erratic flight, carried a message that eventually reshaped wildlife management: work with nature, not against it. And while the soldiers went home, the emus stayed, becoming an enduring symbol of resilience and a reminder that sometimes the best strategy is to adapt.

    Summary

    • In 1932, Australia deployed military forces with machine guns to cull 20,000 emus in Western Australia, but the operation failed, killing fewer than 1,000 birds with 10,000 rounds.
    • The ‘war’ was a political response to farmer complaints during the Great Depression, but it was never formally declared and was termed by the press.
    • Major Meredith’s report noted the emus’ ‘extraordinary toughness’ and recommended a bounty system, which the government adopted.
    • The event shifted wildlife policy from eradication to management, recognizing emus as native species with ecological roles.
    • The Great Emu War remains a cautionary tale about the limits of military solutions to environmental conflicts.

    FAQ

    Q: How many emus were killed in the Great Emu War?
    A: Official reports claimed 986 emus killed, though some accounts suggest 2,500–3,000 including wounded birds. The military fired approximately 10,000 rounds.

    Q: Why did the military get involved in culling emus?
    A: Farmers in Western Australia faced crop destruction and fence damage from emus, and the government wanted to appear responsive to rural voters ahead of elections. The operation was framed as a ‘military exercise’.

    Q: Did the emus actually ‘win’ the war?
    A: In a sense, yes. The military withdrew after two phases, and the emu population rebounded. The cull was widely seen as a failure, and the term ‘war’ was coined by the press to mock the operation.

    Q: What impact did the Great Emu War have on wildlife policy?
    A: It led to a shift from military-led culls to bounty systems and eventually to a more ecological approach, viewing emus as native species to be managed rather than eradicated.

    Q: Are there any lasting memorials or references to the Great Emu War?
    A: While no official memorial exists, the event is celebrated in popular culture, including a 2015 musical and various documentaries, and it remains a popular subject for historians and comedians alike.

  • The Great Emu War of 1932: When Australia Deployed Machine Guns Against Birds

    The Great Emu War of 1932: When Australia Deployed Machine Guns Against Birds

    In 1932, Australia found itself in an unlikely conflict: a military campaign against emus. With machine guns mounted on trucks, soldiers were sent to Western Australia to cull thousands of flightless birds that were devastating wheat crops. The operation, quickly dubbed the ‘Emu War,’ became a global joke—but behind the absurdity lay a desperate struggle for survival during the Great Depression.

    This is the story of how a government’s attempt to solve an agricultural crisis with military force turned into a bizarre chapter in military history, complete with evasive birds, jammed guns, and a humiliated army. It’s a tale that raises questions about bureaucracy, ecology, and the limits of conventional tactics—and it’s a reminder that sometimes reality is stranger than fiction.

    The Setting: A Perfect Storm of Crisis

    The Great Emu War didn’t happen in a vacuum. It was the product of a perfect storm of economic hardship, environmental change, and political desperation.

    In the early 1930s, Western Australian wheat farmers were already reeling from the Great Depression. Wheat prices had plummeted, and a severe drought had made the land even more unforgiving. For many, the harvest was the difference between survival and ruin.

    Then came the emus. These large, flightless birds—standing up to two meters tall—are native to Australia and migrate seasonally. In 1932, a massive influx of emus moved inland from the coast after breeding, coinciding perfectly with the wheat harvest. The birds descended on the crops, eating the grain and, perhaps worse, breaking fences that kept out rabbits—another agricultural pest. For farmers already on the brink, this was a catastrophe.

    They petitioned the government for help, and the government, under Prime Minister Joseph Lyons, responded in a way that would go down in history: they sent in the army.

    The Military Solution: A Plan Doomed from the Start

    The operation was approved with surprising speed. Minister of Defence Sir George Pearce, a Western Australian senator, championed the idea of using the military as a cheap and quick solution. The Royal Australian Artillery was tasked with the job, and Major G.P.W. Meredith of the 7th Heavy Battery was put in command.

    On 2 November 1932, Meredith and his men arrived in the Campion district with two Lewis machine guns mounted on trucks. The plan was simple: drive at the emus, open fire, and thin the herds. It sounded straightforward on paper.

    But the emus had other ideas.

    Emus are not just fast—they can run up to 50 km/h—but they are also remarkably evasive. They scatter in unpredictable patterns, making them difficult targets. The trucks, meanwhile, were slow and clumsy, unable to keep up with the birds or navigate the rough terrain.

    The Lewis guns, a World War I-era weapon, proved unreliable. They jammed frequently, and the heat and dust of the Australian outback didn’t help. Meredith and his men found themselves firing at birds that seemed to dodge bullets with uncanny skill. At one point, Meredith compared the emus to “Zulu warriors” for their tactical cunning.

    The Battle Unfolds: A Week of Frustration

    The first phase of the operation lasted about a week. Despite firing roughly 2,500 rounds of ammunition, the soldiers managed to kill an estimated 986 emus—a fraction of the 10,000 to 20,000 birds believed to be in the area. The emus were winning, and the press was having a field day.

    Newspapers around the world ran headlines like “Emu War” and “Birds Defeat Army.” The operation became a laughingstock, a symbol of bureaucratic absurdity. The Australian government, embarrassed, called off the military deployment on 10 December 1932, officially describing it as a “crop protection measure” rather than a war.

    But the story didn’t end there. A second, smaller operation was attempted in mid-November, and a follow-up in 1934 used a different approach—bounties for emu scalps rather than soldiers. This proved more effective, but the damage to the government’s reputation was done.

    The Aftermath: A Legacy of Laughter and Lessons

    The Great Emu War has become a cultural touchstone, a meme before memes existed. It’s often cited in lists of “weird history” and used as a metaphor for futile wars and government overreach. But there’s more to the story than comedy.

    From a military perspective, the operation is a case study in the failure of conventional tactics against unconventional targets. Machine guns and trucks were no match for fast, agile birds. It’s a lesson that has been echoed in modern counterinsurgency and irregular warfare.

    From an agricultural and economic standpoint, the farmers’ desperation was real. The Depression-era hardship made crop losses a matter of survival. The “war” was a symptom of a broader crisis, not just a joke.

    And from an environmental perspective, the cull raises ethical questions about human-wildlife conflict. Emus are native wildlife, and the European settlers’ approach to managing them was in stark contrast to the sustainable practices of Indigenous Australians, who had long coexisted with the birds.

    The Myths and the Reality

    One of the most persistent myths is that “the emus won.” While it’s true that the military withdrew, the birds didn’t achieve a strategic victory. Hundreds were killed, and the 1934 bounty system was more effective. The “victory” is a narrative device, not a fact.

    Another myth is that this was a “declared war.” It wasn’t. There was no formal declaration—just a military deployment for pest control, later dubbed a “war” by the press. The government was explicit in denying the term, but the label stuck.

    Finally, the scale of the operation is often exaggerated. It was a minor footnote in Australian history, involving a handful of soldiers and a few weeks of work. But its absurdity has given it a lasting place in popular culture.

    Why It Still Matters Today

    The Great Emu War is more than a quirky historical anecdote. It’s a reminder of the dangers of bureaucratic overreach, the importance of understanding the environment before acting, and the limits of military power. It’s also a testament to human resilience—and the ability to laugh at ourselves.

    In an era of climate change and increasing human-wildlife conflict, the lessons of 1932 are more relevant than ever. Modern Australia uses fencing and controlled culls to manage emu populations, not machine guns. But the underlying challenge—balancing agricultural needs with ecological preservation—remains.

    So the next time you hear about the Emu War, remember: it’s not just a joke. It’s a story about a nation’s struggle to adapt, a bird’s unexpected cunning, and the enduring power of a good headline.

    The Great Emu War of 1932 may have been a military embarrassment, but it’s also a fascinating glimpse into a moment when desperation met absurdity. It reminds us that even the most well-intentioned plans can go hilariously wrong, and that sometimes the best response to a crisis is not a machine gun, but a bit of humility and a willingness to learn from the world around us.

    Summary

    • In 1932, the Australian military deployed machine guns and trucks to cull emus damaging wheat crops in Western Australia.
    • The operation lasted from 2 November to 10 December 1932, with soldiers firing ~2,500 rounds and killing ~986 emus.
    • The emus’ speed and evasive tactics, combined with unreliable guns, made the operation ineffective and a global laughingstock.
    • The “war” was never formally declared; it was a crop protection measure that became a media sensation.
    • The event highlights the failure of conventional tactics against unconventional targets and raises ethical questions about human-wildlife conflict.

    FAQ

    Q: Did the emus actually win the war?
    A: Not in a strategic sense. The military withdrew, but hundreds of emus were killed, and a later bounty system was more effective. The “victory” is a narrative device, not a fact.

    Q: Was the Emu War a formally declared war?
    A: No. It was a military deployment for pest control, later dubbed a “war” by the press. The government explicitly denied the term.

    Q: How many emus were killed?
    A: Estimates vary, but the military killed around 986 emus in the 1932 operation, with some sources suggesting up to 2,000 including wounded. This was less than 5% of the local population.

    Q: Why were emus such a problem?
    A: Emus are large, migratory birds that ate wheat crops and broke fences, allowing rabbits into fields. During the Great Depression, this was a catastrophic threat to farmers’ livelihoods.

    Q: What happened after the war?
    A: The government switched to a bounty system, which was more effective. The 1934 follow-up used bounties, not soldiers, and the emu population remained high, but the “war” became a symbol of bureaucratic absurdity.