Tag: chemistry

  • The Chemistry Behind Your Daily Bread: Fermentation, Gluten, and Heat

    The Chemistry Behind Your Daily Bread: Fermentation, Gluten, and Heat

    Have you ever wondered why bread rises into a light, airy loaf while a flatbread stays dense? The answer lies in a series of chemical reactions that transform four basic ingredients into one of humanity’s oldest foods. This article unpacks the roles of flour, water, yeast, and salt, revealing the science of fermentation, gluten formation, and oven heat that creates the perfect loaf.

    Understanding these processes not only satisfies curiosity but also helps bakers troubleshoot problems: why did my bread come out flat? Why is the crust pale? Why is the inside gummy? Each issue traces back to a chemical or physical principle. By the end, you’ll see bread as more than food—it’s a delicious experiment in chemistry.

    The Four Essential Ingredients and Their Roles

    Bread’s simplicity is deceptive. Flour, water, yeast, and salt combine in a delicate balance. Flour provides structure and food for yeast. Water hydrates proteins and enables enzymes. Yeast produces gas that leavens the dough. Salt strengthens gluten and controls fermentation.

    Flour: The Foundation

    Wheat flour stands out among grains because it contains two proteins—gliadin and glutenin—that form gluten when mixed with water. These proteins make up about 80% of wheat flour’s protein content. Other flours, like rye or corn, lack sufficient gluten-forming proteins, which is why they produce denser breads.

    Water: The Activator

    Water does more than moisten. It hydrates gliadin and glutenin, allowing them to bond. It also activates enzymes, such as amylases, which break down starch into sugars that yeast can consume. The amount of water relative to flour—called hydration—determines dough behavior. A 65% hydration dough is stiff and easy to handle, yielding a tight crumb. An 80% hydration dough is sticky and slack, but produces an open, airy crumb with large holes.

    Yeast: The Leavening Agent

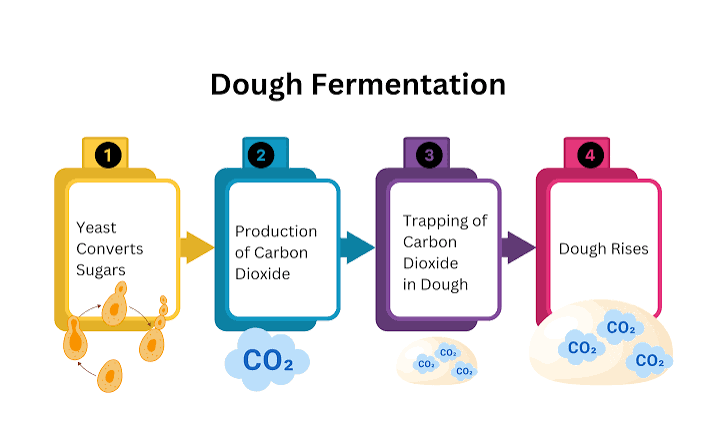
    Yeast (Saccharomyces cerevisiae) is a single-celled fungus that feeds on sugars. When it metabolizes glucose, it produces carbon dioxide and ethanol. This process, called alcoholic fermentation, generates gas that becomes trapped in the gluten network, causing the dough to rise. Yeast also produces acids and other flavor compounds during fermentation.

    Salt: The Regulator

    Salt is often overlooked, but it has three key roles: it strengthens the gluten network, slows yeast activity (preventing over-fermentation), and enhances flavor. Without salt, dough ferments too quickly and becomes sticky and weak.

    Fermentation: The Alchemy of Yeast

    Fermentation is the heart of breadmaking. Yeast converts simple sugars—maltose, glucose, and fructose—into carbon dioxide and ethanol. The chemical equation is straightforward: C₆H₁₂O₆ → 2 C₂H₅OH + 2 CO₂ + energy. The carbon dioxide forms bubbles that inflate the dough.

    Two Types of Fermentation

    Most breads rely on alcoholic fermentation by yeast. But sourdough adds a second process: lactic acid fermentation by bacteria. These bacteria produce lactic and acetic acids, giving sourdough its tangy flavor and longer shelf life.

    Temperature’s Influence

    Yeast is temperature-sensitive. Its optimal activity range is 25–35°C (77–95°F). Below that, fermentation slows; above about 55°C (131°F), yeast dies. Bakers use this to their advantage: refrigerating dough (retardation) slows fermentation, developing flavor over hours or days. Conversely, a warm kitchen speeds proofing.

    The Rise

    During proofing, dough typically doubles or triples in volume as CO₂ accumulates. The gluten network stretches to contain the gas. If proofing goes too long, the gluten over-stretches and collapses, resulting in a flat loaf. If too short, the bread is dense.

    Gluten: The Structural Marvel

    Gluten is the protein network that gives bread its chew and structure. When water meets flour, gliadin and glutenin hydrate and bond. Gliadin contributes extensibility—the ability to stretch. Glutenin contributes elasticity—the ability to spring back. Together, they form a viscoelastic material that can trap gas and hold shape.

    Kneading and Gluten Development

    Kneading does two things: it aligns gluten proteins and promotes disulfide bond formation between them. These bonds create a strong, cross-linked network. Under-kneading leaves the dough weak and fragile. Over-kneading breaks the bonds, making the dough sticky and tearing easily.

    Time as an Alternative to Kneading

    You don’t have to knead to develop gluten. The no-knead method relies on time: over hours, enzymes and acids naturally strengthen the network. Similarly, autolyse—resting flour and water before adding yeast and salt—allows enzymes to break down proteins, improving extensibility without mechanical work.

    The Oven: Where Chemistry Becomes Crust

    Baking transforms the proofed dough into bread. The oven’s heat triggers several reactions, each at a specific temperature.

    Oven Spring

    In the first 10–15 minutes, CO₂ expands rapidly and water vaporizes, causing dough to spring upward. Steam in the oven—from a spray bottle or a Dutch oven—keeps the crust soft longer, allowing maximum expansion before the crust sets.

    Maillard Reaction and Caramelization

    The crust’s brown color and complex flavor come from two reactions. The Maillard reaction occurs between amino acids and reducing sugars at 140–165°C (285–330°F), producing hundreds of flavor compounds. Caramelization is the pyrolysis of sugars at higher temperatures (above 160°C/320°F). While both brown the crust, Maillard is the primary contributor to bread’s savory notes.

    Gelatinization and Crumb Setting

    As the interior heats, starches absorb water and swell at 60–70°C (140–158°F). This gelatinization sets the crumb structure. Proteins coagulate, and the dough firms into a loaf. The internal temperature of done bread reaches 93–96°C (200–205°F).

    Practical Baking Tips from the Chemistry

    Understanding these principles helps solve common issues:

    • Dense crumb: Often under-proofing. Let the dough rise longer until it’s pillowy.
    • Large, tunneled holes: Usually over-proofing. The gluten collapsed before baking.
    • Pale crust: Oven too cool or no steam. Increase temperature and add steam.
    • Burnt crust: Oven too hot or too much sugar in the dough. Lower temperature or reduce sugar.

    Hydration and Crumb

    Higher hydration doughs (80%) produce an open crumb with large, irregular holes—think ciabatta. Lower hydration (65%) yields a tight, fine crumb—like sandwich bread. Adjust water to achieve your desired texture.

    The Role of Autolyse

    Resting flour and water for 20–60 minutes before adding yeast and salt improves extensibility. This allows enzymes to break down proteins, making the dough easier to shape and giving a better rise.

    Bread’s Rich History and Science

    Bread has been made for at least 14,000 years, with leavened bread dating to around 4,000 BCE in Egypt, likely from wild yeast. Sourdough was the only leavening method until commercial yeast was isolated in the 19th century, following Louis Pasteur’s work on fermentation in 1857. The industrial revolution’s roller mills in the 1870s produced finer flour, changing gluten behavior and bread texture. Modern artisan baking revived long fermentations and sourdough, recognizing that time enhances flavor and digestibility.

    Why This Matters Today

    The COVID-19 lockdowns sparked a home-baking boom, with sourdough starters shared worldwide. People sought comfort and understanding in breadmaking. Meanwhile, gluten-free diets have created a demand to know what gluten actually does—and how to replace its structural role. Science demystifies bread, empowering bakers to create better loaves and appreciate the craft.

    Bread is not just flour and water; it’s a symphony of chemistry. From yeast’s metabolic dance to gluten’s protein ballet and the oven’s heat-triggered reactions, every step is a precise chemical process. Next time you pull a golden loaf from the oven, remember: you’re not just baking—you’re conducting a delicious experiment.

    Summary

    • Fermentation: Yeast converts sugars into CO₂ and ethanol, making dough rise and creating flavor.
    • Gluten: Gliadin and glutenin form a viscoelastic network that traps gas and gives structure.
    • Oven heat: Maillard reaction and caramelization brown the crust; gelatinization sets the crumb.
    • Temperature control: Yeast thrives at 25–35°C; oven spring needs steam; internal doneness at 93–96°C.
    • Troubleshooting: Dense bread often under-proofed; pale crust needs higher heat or steam; open crumb requires higher hydration.

    FAQ

    Q: Why does my bread come out dense and heavy?
    A: Dense bread usually results from under-proofing—the dough didn’t rise enough before baking. Let it proof until it’s pillowy and nearly doubled in volume. Also, ensure your yeast is fresh and active.

    Q: What’s the difference between the Maillard reaction and caramelization?
    A: Both brown food, but they’re different. Maillard requires amino acids and sugars, occurring at 140–165°C, producing savory flavors. Caramelization is pure sugar pyrolysis at higher temperatures, yielding nutty, sweet notes. In bread, Maillard is the main crust browning reaction.

    Q: How does steam help bread in the oven?
    A: Steam keeps the crust soft during the first minutes of baking, allowing the dough to expand fully (oven spring). Without steam, the crust sets too early, limiting rise. Use a Dutch oven or spray water to create steam.

    Q: Why is sourdough bread more tangy?
    A: Sourdough uses wild yeast and lactic acid bacteria. The bacteria produce lactic and acetic acids during fermentation, giving the bread its characteristic sour flavor and longer shelf life.

    Q: Can I make bread without kneading?
    A: Yes. The no-knead method uses time to develop gluten instead of mechanical kneading. Resting the dough for 12–18 hours allows enzymes and acids to strengthen the network naturally.
  • The Unexpected Science of Ice Cream: Why It Melts, How It Freezes, and the Physics of the Perfect Scoop

    The Unexpected Science of Ice Cream: Why It Melts, How It Freezes, and the Physics of the Perfect Scoop

    Ice cream is more than a dessert it’s a physics playground. Every scoop is a delicate balance of ice, air, fat, and sugar, all dancing at temperatures far below freezing. But have you ever wondered why ice cream melts so quickly on a hot day, or why it turns rock-hard in your freezer? The answers lie in the surprising science of colloids, freezing point depression, and the relentless march of ice crystals.

    This isn’t just about satisfying your sweet tooth. Understanding the science can help you make better ice cream at home, choose the best pint at the store, and even appreciate the engineering that goes into every scoop. So, let’s pull back the lid and explore the unexpected science of ice cream.

    What Is Ice Cream, Really?

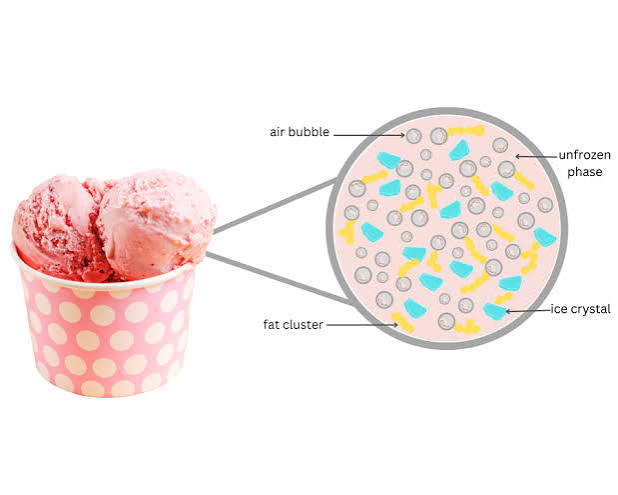
    At its core, ice cream is a complex colloidal foam. That’s a fancy way of saying it’s a mixture of four phases: ice crystals, air bubbles, fat globules, and an unfrozen sugar solution. Each plays a critical role in texture, flavor, and melting behavior.

    To be called “ice cream” in the U.S., the FDA requires at least 10% milkfat and 20% total milk solids. Premium brands often push fat content to 14–16%, which makes them creamier and slower to melt. But fat alone doesn’t tell the whole story. The amount of air whipped in—called overrun—ranges from 30% in dense, premium ice creams to 100% in economy brands. Air isn’t just a filler; it’s structurally essential. Without it, ice cream would be a hard, icy block.

    Stabilizers like guar gum and carrageenan, along with egg yolks (which contain lecithin), help bind water and prevent ice crystals from growing. These ingredients are the unsung heroes that keep your ice cream smooth.

    The Freezing Process: Churn and Freeze

    Ice cream is made by churning and freezing the mix simultaneously in a barrel freezer at about −5°C to −10°C (23°F to 14°F). Rapid freezing and agitation are crucial because they prevent large ice crystals from forming. After churning, the ice cream is hardened at −25°C to −30°C (−13°F to −22°F) for 12–24 hours.

    The ideal serving temperature is around −12°C to −10°C (10°F–14°F). At this range, the fats soften enough to release flavor, but the structure still holds. Home freezers at −18°C (0°F) are much colder, which is why ice cream straight from your freezer is often too hard to scoop. You need to let it warm up a bit.

    Why Ice Cream Melts: A Heat-Transfer Puzzle

    Melting isn’t just ice turning to water. It’s a heat-transfer problem involving fat networks, air cells, and sugar solutions. The unfrozen sugar solution has a lower freezing point than pure water—a phenomenon called freezing point depression. This is why ice cream is scoopable at temperatures where pure ice is rock-hard.

    Fat globules form a network that traps air and slows the drainage of the liquid phase. Higher fat content means slower melting and a creamier mouthfeel. Stabilizers increase the viscosity of the liquid phase, slowing melt and preventing “whey-off”—that watery puddle you sometimes see.

    The Physics of the Perfect Scoop

    If you’ve ever had icy, gritty ice cream, you know the importance of ice crystal size. Crystals above about 50 micrometers are perceived as gritty. Rapid freezing and agitation keep crystals small, which is why churning is essential.

    But even after you buy it, ice cream is under attack. Recrystallization, or Ostwald ripening, is the enemy: small crystals melt and redeposit onto larger ones during temperature fluctuations. Every time your freezer door opens, you’re promoting this process. That’s why ice cream gets icy over time.

    Air cells, typically 20–100 micrometers, act as insulation and provide “chew.” Too little air makes ice cream dense and hard; too much makes it foamy and flavorless. Fat globules, about 1–2 micrometers, partially coalesce during churning, forming a network that stabilizes air and slows melt. This is why low-fat ice cream melts faster and feels watery.

    Sugar: More Than Just Sweetness

    Sugar does more than sweeten; it depresses the freezing point, meaning more sugar results in softer ice cream at a given temperature. Different sugars depress freezing points differently: fructose more than sucrose, glucose less. That’s why “no sugar added” ice creams often use sugar alcohols like erythritol to mimic texture.

    The total solids content determines how much water remains unfrozen at serving temperature—typically 30–50% stays liquid. This unfrozen liquid is what keeps ice cream scoopable.

    A Brief History of Frozen Desserts

    Frozen desserts date back to ancient Persia and China, around 200 BCE–200 CE. Modern ice cream emerged in 17th-century Europe when salt and ice were discovered to lower freezing points below 0°C, enabling the freezing of cream mixtures.

    The hand-cranked churn was invented in 1843 by Nancy Johnson, and commercial continuous freezers followed in the 1920s. Food scientists like W.S. Arbuckle later formalized the physics of freezing and aeration, turning ice cream making into a science.

    The Food Scientist’s View: Formulation and Glass Transition

    Food scientists focus on formulation: balancing fat, sugar, stabilizers, and overrun to hit target texture and melt resistance. They track the freezing curve and draw temperature—how quickly the mix cools and how much ice forms at each stage.

    A key concept is the glass transition temperature, around −30°C to −40°C. Below this, the unfrozen phase becomes a glassy solid, halting recrystallization. This is why commercial ice cream is stored very cold.

    The Artisan Maker’s View: Custard vs. Philadelphia Style

    Artisan makers often use higher fat, lower overrun, and fresh ingredients, but they still must manage the same physics. Custard-based ice creams (with egg yolks) have a richer mouthfeel and different melt properties compared to Philadelphia-style (no eggs).

    Liquid nitrogen ice cream freezes in seconds, creating ultra-small crystals—a dramatic demonstration of rapid freezing. But nitro ice cream melts faster because the fat network hasn’t had time to form a stable structure.

    The Consumer’s View: Why Cold Suppresses Flavor

    Flavor perception is tied to temperature: cold suppresses sweetness and aroma. That’s why ice cream tastes less sweet when frozen and why you might notice more flavor as it melts. This is also why some brands add extra sugar or flavorings to compensate for the cold.

    Next time you enjoy a scoop, you’ll know it’s not just a treat—it’s a triumph of chemistry and physics.

    Ice cream is a marvel of science, balancing ice, air, fat, and sugar in a delicate dance. From the freezing point depression that keeps it scoopable to the glass transition that halts recrystallization, every spoonful is a lesson in physics. Whether you’re a home cook or a curious eater, understanding these principles can help you choose better ice cream, store it properly, and even craft your own perfect scoop. So, the next time you indulge, take a moment to appreciate the science that makes it possible.

    Summary

    • Ice cream is a colloidal foam with four phases: ice crystals, air, fat, and unfrozen sugar solution.
    • Overrun (air content) ranges from 30% to 100%, affecting texture and melt rate.
    • Ice crystal size is crucial; crystals above 50 micrometers feel gritty.
    • Recrystallization causes iciness over time due to temperature fluctuations.
    • Sugar depresses freezing point, making ice cream scoopable at freezer temperatures.
    • Fat networks and stabilizers slow melting and improve mouthfeel.

    FAQ

    Q: Why does ice cream melt so quickly on a hot day?
    A: Melting is a heat-transfer problem. The ice crystals absorb heat from the environment, and the unfrozen sugar solution has a lower freezing point, so it melts faster than pure ice. Fat and stabilizers slow this process by creating a network that holds the structure.

    Q: Why does ice cream get icy in the freezer?
    A: This is due to recrystallization, or Ostwald ripening. Small ice crystals melt during temperature fluctuations and redeposit onto larger ones, making them grow. Over time, the ice cream becomes icy and gritty.

    Q: What is overrun and why does it matter?
    A: Overrun is the amount of air whipped into ice cream, expressed as a percentage. It ranges from 30% (dense, premium) to 100% (economy). Air is essential for texture, but too much makes it foamy and flavorless.

    Q: Why is low-fat ice cream less creamy?
    A: Fat globules form a network that stabilizes air and slows melting. Low-fat ice cream lacks this network, so it melts faster and feels watery.

    Q: Why does ice cream taste less sweet when frozen?
    A: Cold suppresses sweetness and aroma perception. That’s why ice cream often needs extra sugar or flavorings to taste right when served cold.

  • The Accidental Spark: How John Walker’s 1826 Discovery Ignited the Modern Match

    The Accidental Spark: How John Walker’s 1826 Discovery Ignited the Modern Match

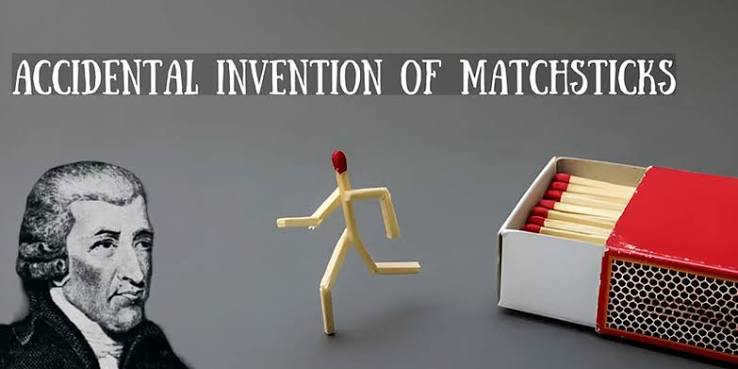
    In 1826, a chemist in northern England accidentally scraped a stick coated with a strange paste against his hearthstone. The stick burst into flame. That moment gave the world the friction match the first fire that anyone could start instantly, without skill, without waiting, and without a smoldering ember. John Walker’s discovery was accidental, but it was no stroke of luck; it was the result of careful observation and a deep understanding of reactive chemicals.

    Before Matches: Fire Was a Chore

    Imagine needing a fire to cook dinner, heat your home, or light a candle. Before the match, that required either keeping a fire constantly burning or mastering a laborious skill. The common method was flint and steel: striking a piece of steel against a flint to create sparks, which you then had to catch on specially prepared tinder—usually charred cloth or dried fungus. It took practice, good materials, and dry conditions. In damp weather, you might fail for hours. Other methods were even more demanding. The fire drill—spinning a stick against a wooden base—required stamina and technique. A solar lens worked only on sunny days. For most people, fire was maintained, not created. You banked your hearth fire overnight, hoping it would still be glowing in the morning. If it went out, you might have to borrow a hot coal from a neighbor.

    In the early 1800s, chemists began experimenting with ways to ignite fire chemically. They had discovered phosphorus (1669) and potassium chlorate (1786), both highly reactive. By 1805, a French chemist named Jean Chancel had made a match that ignited when you dipped it in a small bottle of sulfuric acid—but that was dangerous and cumbersome. What people needed was a simple, safe, and reliable way to start a fire with one hand, in any weather.

    The Accidental Spark: John Walker’s Discovery

    John Walker was a chemist and druggist in Stockton-on-Tees, a port town in northeast England. He was not a famous professor but a practical shopkeeper who mixed remedies and experimented with chemicals. In 1826, he was stirring a pot of a paste made of antimony sulfide, potassium chlorate, gum arabic, and starch. These were common ingredients in his experiments with explosives. When he wiped the stirring stick on his hearthstone to clean it, the dried paste scraped off and ignited, producing a flame.

    Walker recognized what he had seen. The friction had generated enough heat to trigger a chemical reaction between the potassium chlorate (which supplies oxygen) and the antimony sulfide (a fuel). He refined the mixture, shaped it into small sticks, and began selling them as “Congreves,” named after Sir William Congreve, a British rocket pioneer. Each box of 50 cost one shilling—about a day’s wage for a laborer, but still affordable for many households.

    Walker’s matches were not the first chemical matches, but they were the first to use friction to ignite. This was a crucial innovation. Earlier matches required dipping in acid or breaking a glass vial. Walker’s matches could be lit by scraping them against any rough surface—a brick, a piece of sandpaper, or a hearthstone. They were portable, simple, and worked on demand.

    A Missed Fortune: Why Walker Never Patented His Invention

    Walker never patented his invention. Why? Historians speculate that he was not commercially aggressive, or that he was content with his shop. He sold his matches locally, and they were popular. But without a patent, anyone could copy the idea. Within a few years, other chemists and entrepreneurs began producing their own friction matches, often improving on Walker’s formula. Walker did not pursue legal protection, and he died in 1859 without significant wealth from his discovery. His name is remembered in history books but not in the fortune he might have earned.

    The failure to patent had a silver lining: it allowed the match to spread rapidly. By the 1830s, friction matches were being manufactured across Europe and the United States. The principle was out in the open, and inventors could refine it.

    The Dark Side: White Phosphorus and ‘Phossy Jaw’

    Walker’s formula used antimony sulfide, which was relatively safe. But in 1830, a French chemist named Charles Sauria added white phosphorus to the match head. White phosphorus is extremely flammable—it can ignite from the heat of your pocket—but it is also highly toxic. It made matches easier to light, and a new industry grew around the “strike-anywhere” match.

    The cost was horrific. Factory workers who dipped matchsticks into the white phosphorus paste developed a disfiguring and often fatal condition called “phossy jaw”—necrosis of the jawbone. The phosphorus fumes caused the bone to decay, leading to abscesses, loss of teeth, and eventually death. Thousands of workers, many of them young women and children, suffered this fate. White phosphorus was also used in suicides and murders because it was readily available and lethal if ingested.

    The public health crisis eventually forced change. In 1906, the Berne Convention banned the use of white phosphorus in matches. The United States followed in 1912, largely due to the Diamond Match Company, which patented a safe alternative using phosphorus sesquisulfide (P₄S₃) and then donated the patent to the public. This non-toxic compound allowed strike-anywhere matches to remain convenient without the lethal side effects.

    Safety Matches: A Swedish Improvement

    Meanwhile, in Sweden, Gustaf Erik Pasch had introduced a better idea in 1844: separate the chemicals. He placed red phosphorus on the striking surface of the matchbox, not on the match head. The match head contained antimony sulfide and potassium chlorate. Only when you scrape the head against the red phosphorus strip does the reaction occur. This meant the matches were safer—they wouldn’t ignite accidentally on just any surface. However, Pasch’s design was not commercially successful until Johan Edvard Lundström perfected it in 1855. Lundström’s safety matches were a hit, and Sweden became a major match producer. The safety match reduced accidental fires and eliminated the toxic white phosphorus from the match head.

    Today, both safety matches and strike-anywhere matches exist, but the safety match is the standard in most countries due to its lower risk.

    The Matchstick’s Legacy: Fire for the Masses

    The matchstick changed daily life in profound ways. It made fire available to anyone, anytime, without skill or prior preparation. This had ripple effects:

    • Cigarettes became popular: Before matches, smoking a pipe required a lit ember from a fire. With matches, you could light a cigarette anywhere, anytime. This helped drive the rise of cigarette smoking in the late 19th century.
    • Household labor eased: No longer did families have to keep a fire burning all night or labor with flint and steel. A match could light a stove or lamp in seconds.
    • Industry grew: Match factories became major employers, though often under terrible conditions. The industry also drove innovation in industrial chemistry and manufacturing processes.

    The matchstick also illustrates a powerful lesson about innovation: a stroke of luck is only useful if you recognize it. John Walker’s accidental discovery was not a random event. He knew enough chemistry to understand what had happened and to develop it into a marketable product. His failure to patent, however, shows that a good invention is not enough—you need business acumen or a system that protects inventors. The match’s history is a mix of brilliance, tragedy, and eventual regulation, showing how technology can both empower and endanger, and how society eventually steps in to mitigate harm.

    John Walker’s accidental match was a spark that lit a revolution in fire-making. From that moment in 1826, fire became a tool accessible to everyone. But the story doesn’t end with the spark—it continues through the dark chapter of white phosphorus, the regulatory triumph of the Berne Convention, and the Swedish safety match that made fire-making safer for all. The matchstick is a tiny artifact, but it holds a large lesson: innovation can arise from a mishap, but its true value is shaped by human choices—about patents, safety, and responsibility.

    Summary

    • In 1826, John Walker accidentally discovered that a stick coated with a chemical paste ignited when scraped against a rough surface, leading to the first friction match.
    • Walker did not patent his invention, allowing others to copy and improve it, but he gained little financial reward.
    • The addition of white phosphorus in 1830 made matches easier to light but caused ‘phossy jaw’ and poisoning deaths among workers and consumers.
    • The Berne Convention (1906) and later Diamond Match Company’s donation of a safe formula (1911) led to the end of white phosphorus in matches.
    • Safety matches, invented by Gustaf Erik Pasch and perfected by Johan Edvard Lundström in Sweden (1855), separated chemicals and made matches safer.

    FAQ

    Q: Who invented the matchstick?
    A: The modern friction match was invented by John Walker, an English chemist, in 1826. He discovered it accidentally when a stick coated with a chemical paste ignited upon friction.

    Q: Why didn’t John Walker patent his invention?
    A: Historians are not entirely sure, but Walker likely did not see the commercial potential or was not aggressive in business. He sold his matches locally but never secured a patent.

    Q: What was ‘phossy jaw’?
    A: ‘Phossy jaw’ was a painful and often fatal condition caused by exposure to white phosphorus in match factories. It led to necrosis of the jawbone and was common among workers who dipped matches.

    Q: What is the difference between safety matches and strike-anywhere matches?
    A: Safety matches have the phosphorus (red phosphorus) on the striking surface, so they only ignite when struck on that surface. Strike-anywhere matches have phosphorus sesquisulfide in the head, allowing them to ignite on any rough surface.

    Q: When did the use of white phosphorus in matches end?
    A: The Berne Convention in 1906 banned white phosphorus, and the United States followed in 1912. The Diamond Match Company helped by patenting a safe alternative and donating the patent to the public.

  • The Chemistry of Glowing Waves: How Bioluminescent Bays Work

    The Chemistry of Glowing Waves: How Bioluminescent Bays Work

    Imagine dipping your hand into the ocean and watching it ignite with blue sparks. That’s not magic it’s chemistry. In a few rare bays around the world, water literally lights up when disturbed. The effect is so bright that swimmers look like they’re trailing liquid stars.

    These are bioluminescent bays, or bio bays. They’re among the rarest ecosystems on Earth, with fewer than ten consistent examples worldwide. The most famous is Mosquito Bay in Puerto Rico, certified by Guinness World Records as the brightest. But what makes these bays glow? It comes down to tiny single-celled organisms, a chemical reaction, and a very special set of environmental conditions.

    Meet the Glowing Plankton: Pyrodinium bahamense

    The main light-makers in tropical bio bays are dinoflagellates single-celled plankton that drift in the water. The star species is Pyrodinium bahamense. In a healthy bay, you might find over a million of these cells in a single liter of water. That’s like a million tiny flashlights packed into a milk carton.

    Each dinoflagellate contains a small amount of a light-emitting pigment called luciferin and an enzyme called luciferase. When the water is still, these two chemicals are kept separate. But when something—a wave, a paddle, a fish—disturbs the water, it triggers a reaction. Luciferin and luciferase combine with oxygen, producing oxyluciferin and, most importantly, a photon of light.

    This is how the glow happens. The reaction is incredibly efficient: almost all the energy comes out as light, not heat. That’s why it’s called “cold light.” The color is typically blue-green, around 490 nanometers, which is the wavelength that travels farthest through water.

    Bioluminescent bays are a rare intersection of biology, chemistry, and geography. They remind us that even the smallest organisms can create awe-inspiring displays. But they’re also fragile. Protecting them means understanding the delicate balance that keeps them glowing—and making sure our visits don’t snuff out their light.

    Summary

    • Bioluminescent bays glow due to dinoflagellates like Pyrodinium bahamense.
    • The light comes from a chemical reaction between luciferin and luciferase, triggered by movement.
    • These bays are rare because they require a specific mix of geography, mangroves, and clean, dark nights.
    • The glow is a defensive behavior, serving as a “burglar alarm” to startle predators.
    • Human activities, such as pollution and light pollution, threaten these delicate ecosystems.

    FAQ

    Q: Why does the water glow only when you move it?nA: The dinoflagellates keep their light-producing chemicals separate until disturbed. Movement mixes them, triggering the reaction. Still water appears dark because the organisms are at rest.nnQ: Is the glow harmful to humans?nA: No, the bioluminescent dinoflagellates in these bays are not toxic to humans, unlike some red tide species. Swimming is generally safe, though it may be restricted to protect the bay.nnQ: Can you see bioluminescence during the day?nA: No, dinoflagellates only glow at night. Their bioluminescence is suppressed during daylight hours due to an internal biological clock.nnQ: Why are there so few bioluminescent bays?nA: They require a rare combination: a sheltered inlet with a narrow mouth, surrounding mangroves for nutrients, stable warm saline water, and minimal pollution and artificial light. This perfect storm occurs in only a handful of places.nnQ: What threatens bioluminescent bays?nA: Coastal development, sewage runoff, boat traffic, chemical sunscreens, and even too much artificial light can harm the dinoflagellates. Hurricanes, like Maria in 2017, can also temporarily dim the glow.

  • How Instant Heat Packs Work: The Chemistry of Warm Hands

    Why do single-use heat packs get hot? | ThreeBond Group

    When you crack open a hand warmer on a freezing winter day, you’re not just getting a little bag of warmth—you’re unleashing a carefully engineered chemical reaction. Whether it’s a disposable packet that heats up when exposed to air or a reusable pouch that crystallizes at the click of a metal disc, the heat comes from real chemistry. Here’s what’s happening inside those little packets and why they get so hot.

    Two Kinds of Heat, Two Kinds of Chemistry

    Instant heat packs fall into two main categories: disposable, air-activated warmers that rely on iron rusting at warp speed, and reusable packs that exploit a quirky property of supersaturated sodium acetate. Each uses a different scientific trick to generate heat, and each has its own strengths.

    Air-Activated Hand Warmers: Rusting, Accelerated

    You’ve probably used these: a sealed pouch that, once opened, slowly warms up and stays hot for hours. The active ingredient is iron powder. When exposed to air, the iron reacts with oxygen in an exothermic oxidation reaction—essentially rusting, but sped up dramatically.

    The simplified chemical equation is:

    4Fe + 3O₂ → 2Fe₂O₃ + heat

    But the pack isn’t just iron. It’s a carefully balanced mix:

    • Iron powder — the fuel
    • Activated carbon — disperses heat and holds moisture
    • Salt (sodium chloride) — acts as a catalyst
    • Water — required for the reaction to proceed
    • Cellulose or vermiculite — holds water and prevents clumping

    When you open the sealed package, oxygen floods in and the reaction kicks off. The salt and water accelerate the oxidation, and the carbon helps spread the heat evenly. The result? A steady 50–60°C (122–140°F) for 6–10 hours. This is the same reaction as rust formation, but engineered to happen in hours, not years.

    Reusable Heat Packs: The Supersaturation Trick

    Reusable packs look like a pouch filled with liquid and a small metal disc. Click the disc, and the liquid solidifies into a warm, slushy mass. This is not a chemical reaction—it’s a phase change.

    The liquid is a supersaturated solution of sodium acetate. Supersaturation means it holds more dissolved salt than should be possible at room temperature. The solution is metastable: it wants to crystallize, but needs a trigger.

    The metal disc is that trigger. When you click it, it flexes and releases a tiny seed crystal (or creates microscopic scratches that act as nucleation sites). Crystallization spreads instantly through the liquid, and as the dissolved salt solidifies, it releases the latent heat of fusion that was absorbed when it originally dissolved. The pack heats to about 54°C (129°F) for 20–60 minutes.

    To reset it, you boil the pack until all crystals dissolve back into solution. As it cools, it becomes supersaturated again, ready for another use.

    Why “Instant”?

    Both types are designed to be portable, self-contained, and safe—no flames, no electricity. The chemistry is chosen because it’s exothermic (releases heat) and can be triggered easily. But the trigger is different: air exposure for iron, a physical click for sodium acetate. Both systems need a small “activation energy” to get going.

    Clearing Up Common Misconceptions

    • “They contain chemicals that burn.” — No combustion occurs. Heat comes from a chemical reaction (oxidation) or a physical change (crystallization), not fire.
    • “Reusable packs work by electricity.” — No. They work by phase change, and boiling resets them.
    • “The metal disc is a battery.” — It’s just a nucleation trigger. It flexes to release a tiny crystal or create a scratch.
    • “Iron packs are just rusting.” — Technically true, but the engineering is in maximizing surface area and accelerating the process.

    Consumer and Environmental Considerations

    Disposable warmers are cheap and long-lasting, but they’re single-use and end up in landfill. Reusable packs cost more upfront but cut down on waste, though they require energy to boil for resetting. Both are safe if used as directed—avoid puncturing them, as sodium acetate can irritate skin and iron powder is hazardous if inhaled.

    A Great STEM Demonstration

    These packs are fantastic tools for teaching chemistry. They illustrate exothermic reactions, oxidation-reduction, phase changes, and supersaturation in a hands-on way. Classrooms often use them to show thermodynamics and kinetics, making abstract concepts tangible.

    The Bottom Line

    Instant heat packs are clever applications of basic chemistry. Whether you’re using a disposable warmer on a ski lift or a reusable pack for muscle aches, you’re relying on the same fundamental science: exothermic reactions and phase changes. Understanding the chemistry doesn’t make the warmth any less welcome—but it does explain why that little packet gets so hot.

    The next time you crack open a hand warmer, you’ll know exactly what’s happening: iron is rusting at record speed, or sodium acetate is crystallizing and releasing stored heat. It’s chemistry in your pocket, and it’s been keeping people warm for decades.

    Summary

    • Disposable heat packs use iron powder that oxidizes (rusts) in an exothermic reaction when exposed to air.
    • Reusable heat packs use a supersaturated sodium acetate solution that crystallizes when triggered by a metal disc, releasing heat.
    • The heat from iron packs lasts 6–10 hours at 50–60°C; sodium acetate packs last 20–60 minutes at ~54°C.
    • Reusable packs are reset by boiling, which re-dissolves the crystals.
    • Both types are safe, but disposal and energy use are considerations.

    FAQ

    Q: Are instant heat packs safe to use?
    A: Yes, both types are generally safe. The heat is moderate and contained. However, avoid puncturing the packs—sodium acetate can irritate skin, and iron powder is hazardous if inhaled.

    Q: How long do disposable hand warmers last?
    A: Disposable, air-activated warmers typically last 6–10 hours at 50–60°C (122–140°F).

    Q: Can I reuse a disposable hand warmer?
    A: No. Once the iron is fully oxidized, the reaction is complete and the pack is spent.

    Q: Why does clicking the disc in a reusable pack make it heat up?
    A: Clicking the disc releases a tiny seed crystal or creates microscopic scratches that trigger rapid crystallization of the supersaturated sodium acetate solution. This phase change releases heat.

    Q: How do I reset a reusable heat pack?
    A: Boil the pack in water until all crystals dissolve completely, then let it cool slowly to room temperature. It will become supersaturated again and ready for reuse.