Tag: beginner

  • Canva for Beginners: A Step-by-Step Guide to Your First Design

    A beginner's guide to using Canva

    Have you ever stared at a blank page, wanting to create a beautiful flyer, social media post, or presentation, but felt overwhelmed by complex design software? You’re not alone. For years, graphic design was a skill reserved for professionals with expensive tools and years of training. But in 2012, a small startup in Sydney, Australia, set out to change that. Canva was born with a simple mission: make design accessible to everyone.

    Today, Canva is used by over 170 million people every month, from teachers and small business owners to students and social media influencers. Its drag-and-drop interface, thousands of templates, and generous free plan have made it the go-to tool for anyone who needs to create visual content without a design degree. In this guide, we’ll walk you through everything you need to know to create your first design, from setting up your account to downloading your finished masterpiece.

    Getting Started: Creating Your Canva Account

    The first step is to create a free account. Go to canva.com and click the “Sign up” button. You can sign up with your email address, Google account, or Facebook account. Choose whichever is most convenient for you. Once you’ve signed up, you’ll be taken to the Canva home screen.

    Navigating the Canva Dashboard

    The dashboard is your command center. On the left side, you’ll see a sidebar with options like “Home,” “Templates,” “Projects,” and “Brand.” In the center, you’ll see a search bar and a grid of design types. This is where you can start a new design or browse templates.

    Take a moment to explore. Click on “Templates” to see the vast library of pre-designed layouts. You can search for specific types like “Instagram Post,” “Resume,” or “Birthday Invitation.” Don’t worry about making a mess—you can’t break anything. Just click around to get comfortable.

    Choosing Your First Template

    Templates are the fastest way to create a professional-looking design. For this tutorial, let’s create a simple social media post. Click on “Social Media” in the design types, then choose “Instagram Post.” You’ll see a grid of templates. Pick one that catches your eye—maybe a quote graphic or a promotional post. Click on it, and it will open in the editor.

    The Canva Editor: A Quick Tour

    The editor is where the magic happens. Here’s a breakdown of the main areas:

    • Left Panel: This has tabs for Templates, Photos, Elements, Text, and more. You can search for specific items or browse categories.
    • Canvas: The main area in the center where your design appears. You can click on any element to select it.
    • Top Toolbar: This has buttons for undo/redo, file, resize, and download. When you select an element, the toolbar changes to show formatting options.
    • Right Panel: When you select an element, this panel shows properties like color, font, and transparency.

    Editing Text: Making It Yours

    Click on the text in your template. You’ll see a text box appear with handles. You can drag it to move it, or use the corner handles to resize. In the right panel, you can change the font, size, color, and alignment. Double-click the text to edit the actual words. Type in your own message, like “Welcome to My Page!” or “Sale This Weekend!”

    Changing Colors and Fonts

    To change the color of a text or shape, click on it, then in the right panel, click the color box. You can choose from the preset colors or use the custom color picker. For fonts, click the font dropdown and scroll through the hundreds of options. Canva suggests font pairings that look good together, so you can click “Pairings” to see recommendations.

    Adding Images and Elements

    To add an image, go to the left panel and click “Photos.” You can search for free stock photos or upload your own by clicking “Uploads.” Drag a photo onto your canvas. You can resize and reposition it. To add shapes, icons, or illustrations, click “Elements” and search for what you need. For example, search “stars” to add some decorative stars.

    Using the Position and Arrange Tools

    If you have multiple elements overlapping, you can control which one is on top. Click on an element, then in the top toolbar, click “Position.” You’ll see options like “Bring forward” and “Send backward.” This is useful when you want text to appear in front of a shape, or an image behind text.

    Downloading Your Design

    Once you’re happy with your design, it’s time to download it. Click the “Share” button in the top right, then select “Download.” You’ll see a menu with file types. For most purposes, PNG is a good choice because it’s high quality and supports transparent backgrounds. JPG is smaller but doesn’t support transparency. PDF is great for printing. Choose PNG, select the size (we recommend the default), and click “Download.”

    Saving and Organizing Your Projects

    Your design is automatically saved to your Canva account as you work. You can find it later by clicking “Projects” in the sidebar. You can create folders to organize your designs. For example, create a folder called “Social Media” and move your design there.

    Next Steps: Explore and Experiment

    Now that you’ve created your first design, the possibilities are endless. Try making a presentation, a flyer, or a YouTube thumbnail. Experiment with different templates and tools. Canva also offers free tutorials and courses through Canva Design School if you want to learn more.

    Remember, the key to getting better is practice. Don’t be afraid to make mistakes—you can always undo. And with Canva’s intuitive interface, you’ll be designing like a pro in no time.

    Canva has truly democratized design, putting powerful tools in the hands of anyone with an idea. By following this step-by-step guide, you’ve learned the basics: creating an account, navigating the dashboard, using templates, editing text and images, and downloading your work. Now it’s time to unleash your creativity. Whether you’re designing for business, school, or fun, Canva is your canvas—go paint something amazing.

    Summary

    • Canva is a free, cloud-based design tool with over 170 million users.
    • Start by creating an account and exploring the dashboard.
    • Use templates to quickly create professional designs.
    • Edit text, colors, images, and elements with the drag-and-drop editor.
    • Download your design as PNG, JPG, or PDF, and organize projects in folders.

    FAQ

    Q: Is Canva really free?
    A: Yes, Canva has a free plan that includes thousands of templates, 5GB of storage, and basic design tools. There are no watermarks on free designs. Pro features like brand kits and background remover require a paid subscription.

    Q: Can I use Canva on my phone?
    A: Absolutely. Canva has apps for iOS and Android, so you can design on the go. Your projects sync across devices.

    Q: What file formats can I download from Canva?
    A: You can download as PNG, JPG, PDF, SVG (Pro), GIF, MP4, and PPTX (Pro). PNG is best for images with transparent backgrounds.

    Q: How do I remove the background from an image?
    A: The background remover is a Pro feature. If you’re on the free plan, you can use the “BG Remover” app in Canva, but it’s limited. Alternatively, you can use a free online tool and then upload the image.

    Q: Can I use Canva for commercial purposes?
    A: Yes, you can use Canva designs for commercial use, even on the free plan. However, some elements and templates may have restrictions, so check the license for each item. Canva provides a content license that allows most uses.

  • Meditation for Beginners: A Practical, Evidence-Based Guide to Getting Started

    Meditation For Beginners - Mandala Yoga Dublin

    You’ve probably heard that meditation can reduce stress, improve focus, and even lower blood pressure. Maybe you’ve tried an app for a few days, only to give up because your mind wouldn’t stop wandering. Or perhaps you’re curious but feel intimidated by the lotus position and incense.

    Here’s the good news: meditation is simpler than you think, and you don’t need any special equipment or 30-minute blocks of silence. This guide will walk you through the basics, clear up common misconceptions, and give you a practical starting point—all grounded in evidence and expert consensus.

    What Meditation Really Is (and Isn’t)

    Meditation is not a single practice but a family of techniques designed to cultivate a heightened state of awareness and focused attention. Think of it as a mental workout—not a mystical escape from reality.

    Common forms for beginners include:

    • Mindfulness meditation: Observing the present moment without judgment, often using the breath as an anchor.
    • Focused attention: Concentrating on a single object, sound (like a mantra), or sensation.
    • Loving-kindness (metta): Cultivating compassion toward yourself and others.
    • Body scan: Progressively moving your attention through physical sensations.

    One of the biggest myths is that meditation means emptying your mind. In reality, it’s about noticing when your mind wanders and gently bringing it back. That ‘noticing and returning’ is the core exercise—like a bicep curl for your attention.

    Getting Started: The Practical Basics

    Duration: Start Small

    Forget the idea that you need to meditate for 30 minutes a day. Research and teachers agree that 5–10 minutes daily is effective for beginners. Consistency beats duration. A short daily practice will yield more benefit than an occasional marathon session.

    Posture: Comfort is Key

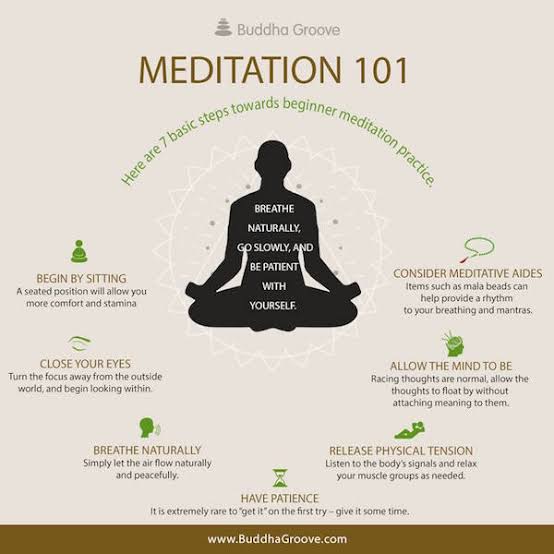
    You don’t need to sit cross-legged on the floor. The goal is a comfortable position with a straight but relaxed spine. You can sit on a chair, a cushion, or even lie down—though lying down might make you sleepy. Keep your eyes open or closed, whatever feels natural, and rest your hands on your knees or lap.

    A Simple 5-Minute Mindfulness Practice

    1. Find a quiet spot where you won’t be disturbed. Set a timer for 5 minutes.
    2. Sit comfortably with your back straight but not rigid.
    3. Close your eyes or lower your gaze.
    4. Bring your attention to your breath—notice the sensation of air entering and leaving your nostrils, or the rise and fall of your chest.
    5. When your mind wanders (and it will), simply notice that you’ve drifted, and gently return your attention to the breath. No judgment, no frustration.
    6. When the timer goes off, take a moment to notice how you feel before getting up.

    That’s it. The ‘distraction and return’ loop is the practice. Each time you notice your mind wandering and bring it back, you’re strengthening your attention muscle.

    Why It Works: The Evidence Behind the Hype

    Meditation isn’t just feel-good woo—it has a growing body of scientific support. Here’s what the research shows:

    • Reduced stress and anxiety: Moderate evidence supports meditation’s ability to lower stress markers like cortisol.
    • Improved attention and focus: Regular practice trains your ability to sustain attention and resist distraction.
    • Better emotional regulation: You become less reactive to emotional triggers.
    • Lower blood pressure: Some studies show modest reductions in blood pressure.
    • Improved sleep quality: Meditation can help quiet a racing mind at bedtime.

    These benefits accrue over weeks and months of consistent practice—not after a single session. So don’t expect a miracle after one try. Think of it like physical exercise: you wouldn’t expect to run a marathon after one jog.

    Common Misconceptions, Debunked

    • “I can’t meditate because I can’t empty my mind.” As we’ve said, that’s not the goal. You’re not trying to stop thoughts; you’re learning to observe them without getting swept away.
    • “I need to sit on the floor in lotus position.” Absolutely not. Chairs, cushions, lying down, or even walking meditation are all valid.
    • “Meditation is a religion.” While meditation has roots in Hindu and Buddhist traditions, it’s also found in Taoist, Christian, Jewish, and Islamic contemplative practices. Secular forms, like Mindfulness-Based Stress Reduction (MBSR), are widely used in healthcare without any religious framing.
    • “It works instantly.” A single session might feel relaxing, but durable changes require regular practice.
    • “I need to meditate for at least 30 minutes.” False. Short daily practice (5–10 minutes) is effective for beginners.
    • “If I get distracted, I failed.” Distraction is normal and part of the practice. The ‘repetition’ of noticing is the workout.
    • “Meditation is safe for everyone.” Generally yes, but it can exacerbate anxiety or trauma in some individuals. If you have severe mental health conditions, consult a professional before starting.

    Choosing Your Path: Secular, Spiritual, or Something In Between

    Meditation today comes in many flavors. You can use an app like Headspace or Calm, join a local meditation group, or explore traditional teachings. Some people appreciate the secular, science-based approach; others find deeper meaning in the spiritual context.

    There’s also a growing debate about “McMindfulness”—the commercialization of meditation as a productivity tool, stripped of its ethical and spiritual roots. Critics argue that this dilutes the practice, while proponents say it makes meditation accessible to more people. There’s no right answer; it’s about what resonates with you.

    Making It a Habit

    Here are some tips to stick with it:

    • Anchor it to an existing habit: Meditate right after brushing your teeth or with your morning coffee.
    • Use a timer: This prevents you from checking the clock.
    • Be kind to yourself: Missed a day? No problem. Just start again tomorrow.
    • Try different styles: If mindfulness doesn’t click, try a body scan or loving-kindness meditation.

    A Note on Accessibility and Safety

    Meditation should be inclusive. If sitting still is uncomfortable, try walking meditation or lying down. If you have a history of trauma, be cautious—silent meditation can sometimes bring up difficult emotions. In such cases, it’s wise to work with a qualified teacher or therapist.

    The Bottom Line

    Meditation is a simple, evidence-based practice that can improve your well-being—but it’s not a quick fix. Start with 5 minutes a day, keep your expectations realistic, and remember that the wandering mind is not a failure; it’s the very thing you’re training.

    Meditation is a journey, not a destination. By starting small, staying consistent, and letting go of perfectionism, you can build a practice that supports your mental and physical health. Whether you’re seeking stress relief, better focus, or a deeper sense of calm, the benefits are within reach—one breath at a time.

    Summary

    • Meditation is a family of techniques, not a single practice; mindfulness is a popular starting point.
    • Start with 5–10 minutes a day; consistency matters more than duration.
    • You don’t need to empty your mind or sit cross-legged—comfort and a relaxed spine are key.
    • Evidence supports benefits like reduced stress, improved focus, and better sleep, but they require regular practice over weeks.
    • Common myths include needing 30+ minutes, instant results, and that distraction means failure.

    FAQ

    Q: How long should I meditate as a beginner?
    A: Start with 5–10 minutes a day. It’s more effective to practice daily for a short time than occasionally for a long time.

    Q: What if I can’t stop thinking during meditation?
    A: That’s completely normal. The goal isn’t to stop thoughts but to notice them and gently return your attention to your breath. Each time you do that, you’re strengthening your focus.

    Q: Do I need to sit on the floor?
    A: No. You can sit on a chair, a cushion, or even lie down. The key is a comfortable position with a straight but relaxed spine.

    Q: Is meditation a religious practice?
    A: Meditation has roots in many religious traditions, but it’s not inherently religious. Secular forms like MBSR are widely used in healthcare and wellness settings.

    Q: Can meditation make my anxiety worse?
    A: In some cases, yes—especially if you have a history of trauma or severe anxiety. If you’re concerned, consult a mental health professional before starting a meditation practice.

  • How to Start Investing in Stocks: A Beginner’s Roadmap

    What are Stocks, Shares and Equities + How do they Work? | IG AU

    Investing in stocks is one of the most powerful ways to build long-term wealth, yet it can feel intimidating for beginners. With thousands of companies to choose from, complex jargon, and the constant buzz of market news, it’s easy to get overwhelmed. But here’s the good news: you don’t need to be a Wall Street expert to get started. In fact, the basics are simpler than you might think, and the tools available today make it easier than ever to begin.

    This guide will walk you through the fundamentals—what stocks are, how you make money, key metrics to understand, and the different strategies you can adopt. Whether you’re looking to grow your savings, plan for retirement, or simply make your money work harder, this roadmap will give you the confidence to take your first steps into the stock market.

    What Exactly Is a Stock?

    A stock, also known as a share, represents partial ownership in a publicly traded company. When you buy a share, you own a tiny fraction of that company’s assets and earnings. For example, if you own shares of Apple, you’re a part-owner of Apple, entitled to a slice of its profits and growth.

    Stocks are bought and sold on exchanges like the New York Stock Exchange (NYSE) and NASDAQ, through brokerage accounts. There are two main types of stocks:

    • Common stock: Gives you voting rights at shareholder meetings and may pay dividends, but dividends are not guaranteed.
    • Preferred stock: Typically doesn’t give voting rights, but pays fixed dividends and has a higher claim on assets if the company goes bankrupt.

    How Investors Make Money

    There are two primary ways to make money from stocks:

    1. Capital appreciation: Buying shares at a lower price and selling them at a higher price. This is the most common goal for growth investors.
    2. Dividends: Periodic cash payments made from a company’s profits. Not all companies pay dividends—many reinvest profits back into the business. Dividend-paying stocks are often mature, stable companies.

    Key Metrics Every Beginner Should Know

    Understanding a few basic metrics will help you evaluate stocks and make informed decisions:

    • Market cap: The total value of a company’s shares. Large-cap companies are over $10 billion, mid-cap between $2–10 billion, and small-cap under $2 billion. Generally, larger companies are more stable, while smaller ones offer higher growth potential but more risk.
    • P/E ratio (price-to-earnings): The price per share divided by earnings per share. It’s a rough measure of how expensive a stock is relative to its earnings. A high P/E might mean the stock is overvalued or expected to grow rapidly; a low P/E could indicate a bargain or a struggling company.
    • EPS (earnings per share): Company profit divided by the number of shares outstanding. It’s a direct indicator of profitability.
    • Dividend yield: Annual dividend per share divided by the stock price, expressed as a percentage. For example, a stock priced at $100 that pays $3 annually has a 3% yield.

    Basic Order Types

    When you’re ready to buy or sell, you’ll use different order types:

    • Market order: Executes immediately at the current market price. Simple, but you might get a slightly different price than expected in fast-moving markets.
    • Limit order: Sets a specific price at which you’re willing to buy or sell. The trade only executes if the price reaches your limit. This gives you control but might not fill if the price doesn’t move.
    • Stop-loss order: Automatically sells a stock if it drops to a certain price, helping you limit losses. It’s a risk-management tool.

    The Costs of Investing

    Gone are the days of high commissions. Most major online brokers—like Fidelity, Vanguard, Charles Schwab, and Robinhood—now offer $0 commission trades. However, you should still be aware of other costs:

    • Expense ratios: If you invest in mutual funds or ETFs, they charge an annual fee, typically 0.03% to 1% or more. Lower is better.
    • Spread: The difference between the bid (what buyers are willing to pay) and ask (what sellers are asking) price. This is a hidden cost that can eat into your returns, especially for less liquid stocks.

    Historical Context: Why Stocks Over the Long Run?

    The stock market has historically delivered strong returns. The S&P 500, a benchmark of 500 large U.S. companies, has averaged about 7–10% annually (nominal), or around 6–7% after inflation. While past performance doesn’t guarantee future results, stocks have outpaced inflation and other asset classes over long periods.

    Importantly, the market has recovered from every major downturn, from the Great Depression to the 2008 financial crisis to the COVID-19 crash. However, individual stocks can go to zero, so diversification is key.

    Why People Invest in Stocks

    • Inflation hedge: Cash loses purchasing power over time. Stocks have historically grown faster than inflation, preserving and increasing your wealth.
    • Compound growth: When you reinvest dividends and let your gains grow, your returns start earning returns. Over decades, this compounding effect can turn modest contributions into substantial sums.
    • Retirement planning: Most retirement accounts, like 401(k)s and IRAs, rely on stock market growth to fund your future.

    How the Market Works (Simplified)

    Stock prices move based on supply and demand, driven by company earnings, economic data, news, and investor sentiment. When prices rise over a prolonged period, it’s called a bull market; when they fall by 20% or more, it’s a bear market. Volatility—daily price fluctuations—is normal. The key is to focus on the long-term trend, not short-term noise.

    The Evolution of Investing for Beginners

    Investing used to require a broker, high fees, and paper certificates. Today, app-based trading, fractional shares, zero commissions, and robo-advisors have democratized access. Fractional shares, for instance, allow you to buy a slice of an expensive stock like Amazon with just $100. This accessibility shift means anyone can start investing with small amounts.

    Regulatory Protections

    Your investments are protected by several layers of regulation:

    • SEC (Securities and Exchange Commission) oversees the markets to ensure fairness.
    • SIPC protects brokerage accounts up to $500,000 in securities if your broker fails (not against market losses).
    • FINRA regulates broker-dealers to ensure they follow ethical practices.

    Different Investment Strategies

    The “Buy and Hold” / Passive Approach

    This is the most recommended strategy for beginners. Invest in low-cost index funds, like S&P 500 ETFs (VOO, SPY) or total market funds. The idea is simple: time in the market beats timing the market. You make regular contributions (dollar-cost averaging) and hold for decades. Minimal research required, and historically, this approach has outperformed most active managers.

    Active Stock Picking

    If you enjoy research, you might pick individual stocks. This involves analyzing financial statements, competitive advantages, and management. The potential returns are higher, but so is the risk and time commitment. It requires understanding valuation and industry trends, plus the discipline to avoid emotional decisions.

    Dividend Investing

    Focus on companies with consistent dividend payments, like utilities or consumer staples. The goal is to build a passive income stream. Reinvesting dividends accelerates compounding. This strategy is popular among income-oriented investors and retirees.

    Growth vs. Value Investing

    • Growth investing: Targets companies with high expected future earnings, like tech or biotech. These often don’t pay dividends and have higher volatility.
    • Value investing: Looks for undervalued stocks relative to fundamentals—low P/E, strong assets. The idea is to “buy on sale.” Both styles have periods of outperformance; neither is universally superior.

    Risk-Tolerance Spectrum

    Your risk tolerance should guide your asset allocation:

    • Conservative: Blue-chip stocks, dividend payers, and bonds.
    • Moderate: A diversified mix of large/mid-cap stocks plus some bonds.
    • Aggressive: Small-caps, emerging markets, sector bets, even crypto-adjacent plays.

    Ethical / ESG Investing

    Some investors screen for environmental, social, and governance (ESG) factors. This aligns your portfolio with your values. The performance impact is debated—some studies show it can reduce returns, others suggest it reduces risk. It’s a personal choice.

    Getting Started: Your First Steps

    1. Open a brokerage account: Choose a reputable broker with $0 commissions and a user-friendly app.
    2. Set a budget: Decide how much you can invest regularly. Even $50 a month is fine.
    3. Start with an index fund: For most beginners, a low-cost S&P 500 ETF is the safest bet.
    4. Automate contributions: Set up recurring transfers to build the habit.
    5. Stay the course: Ignore short-term fluctuations and keep your long-term goals in mind.

    Investing in stocks is a journey, not a sprint. By understanding the basics, choosing a strategy that fits your goals and risk tolerance, and staying disciplined, you can harness the power of the stock market to build lasting wealth. Start small, stay consistent, and let time and compounding do the heavy lifting.

    Summary

    • Stocks represent partial ownership in a company, and you make money through capital appreciation and dividends.
    • Key metrics like market cap, P/E ratio, EPS, and dividend yield help evaluate stocks.
    • Use market, limit, and stop-loss orders to control your trades.
    • Most brokers now offer $0 commissions, but watch out for expense ratios and spreads.
    • For beginners, low-cost index funds and a buy-and-hold strategy are often the best approach.

    FAQ

    Q: How much money do I need to start investing in stocks?
    A: You can start with as little as $1 using fractional shares. Many brokers have no minimum deposit, so you can begin with any amount you’re comfortable with.

    Q: What’s the difference between a stock and an ETF?
    A: A stock is a single company’s share, while an ETF (exchange-traded fund) is a basket of many stocks (or other assets) that you can buy like a stock. ETFs provide instant diversification.

    Q: Is investing in stocks risky?
    A: Yes, stocks carry risk, including the possibility of losing your entire investment in a single company. However, diversification and a long-term horizon can mitigate risk.

    Q: How often should I check my portfolio?
    A: For long-term investors, checking too frequently can lead to emotional decisions. A monthly or quarterly review is usually sufficient.

    Q: What is dollar-cost averaging?
    A: It’s investing a fixed amount at regular intervals, regardless of the stock price. This strategy reduces the impact of volatility and avoids trying to time the market.

  • How to Remove a Background in Photoshop: 3 Easy Methods for Beginners

    How To Remove a Background In Photoshop [For Beginners!]

    Removing a background is one of the most common tasks in Photoshop, whether you’re preparing product photos for an online store, creating social media graphics, or just cleaning up a portrait. It’s a skill that every designer, photographer, and content creator needs to master. Fortunately, modern Photoshop makes this easier than ever, thanks to AI-powered tools that can do the heavy lifting in a single click.

    In this tutorial, we’ll walk you through three straightforward methods for removing backgrounds: the one-click Select Subject, the Remove Background button, and the more hands-on Quick Selection Tool. You’ll learn the pros and cons of each, so you can choose the right approach for your specific image. We’ll also cover best practices like using layer masks and saving with transparency, so your results look clean and professional.

    Method 1: Select Subject (One-Click AI)

    Select Subject is Photoshop’s AI-powered tool that automatically detects the main subject in your image and creates a selection around it. It’s perfect for images with a clear subject against a simple background.

    How to Use It:

    1. Open your image in Photoshop.
    2. Click on the Select menu at the top and choose Subject. Alternatively, you can use the keyboard shortcut Ctrl+Alt+S (Windows) or Cmd+Option+S (Mac).
    3. Photoshop will analyze the image and create a selection (shown as marching ants) around the subject.
    4. With the selection active, click on the Add Layer Mask icon at the bottom of the Layers panel. This will hide the background, leaving your subject on a transparent background.

    When to Use It:

    • Best for: Images with a clear subject and a relatively simple background, such as a person standing against a plain wall.
    • Pros: Fast, requires no manual work, and is non-destructive (the original image is preserved).
    • Cons: It may struggle with complex edges like hair or fur, or when the subject blends into the background.

    Pro Tip:

    After using Select Subject, zoom in to check the edges. If you see any rough spots, you can refine them using the Select and Mask workspace (right-click the selection and choose Select and Mask). This lets you smooth, feather, or shift the edge for a more natural look.

    Method 2: Remove Background (One-Click Button)

    Photoshop also has a dedicated Remove Background button that does exactly what it says—it removes the background in one click. This tool is available in the Properties panel when you have a layer selected.

    How to Use It:

    1. Open your image and select the layer you want to edit.
    2. Go to the Properties panel (if it’s not visible, go to Window > Properties).
    3. Click the Remove Background button. Photoshop will automatically create a layer mask that hides the background.
    4. You can then refine the mask manually if needed.

    When to Use It:

    • Best for: Quick edits when you need a fast result, especially for simple images.
    • Pros: Super fast, one-click, and non-destructive (it creates a mask, not a permanent deletion).
    • Cons: Like Select Subject, it may not handle complex edges perfectly. It also gives you less control compared to manual methods.

    Pro Tip:

    After clicking Remove Background, you can still edit the mask. Use the Brush Tool with black or white to paint over areas you want to hide or reveal. This is a great way to clean up any mistakes.

    Method 3: Quick Selection Tool (Manual Control)

    For images where the AI tools struggle, the Quick Selection Tool gives you manual control. It works by painting over the areas you want to select, and Photoshop automatically expands the selection to similar pixels.

    How to Use It:

    1. Select the Quick Selection Tool from the toolbar (or press W).
    2. In the options bar at the top, choose a brush size. Start with a medium size and adjust as needed.
    3. Paint over the subject. You’ll see a selection (marching ants) appear. The tool will automatically snap to edges.
    4. If you accidentally select too much, hold Alt (Windows) or Option (Mac) and paint over the area to subtract it from the selection.
    5. Once you’re happy with the selection, click Add Layer Mask to hide the background.

    When to Use It:

    • Best for: Images with complex edges, such as hair, fur, or objects with lots of detail.
    • Pros: You have full control, and you can refine the selection as much as you want.
    • Cons: It takes more time and practice, especially for tricky edges.

    Pro Tip:

    After making your selection, go to Select > Select and Mask to fine-tune the edges. Use the Refine Edge brush to paint over hair or fur for a more natural cutout.

    Why Use Layer Masks Instead of Deleting?

    When you remove a background, you might be tempted to just delete the background pixels. But that’s a destructive edit—once you delete, you can’t get the background back without undoing multiple steps. Instead, use a layer mask. A mask is like a stencil that hides parts of the layer without actually removing them. This means you can always go back and edit the mask later, making it the professional standard.

    Saving Your Image with Transparency

    After removing the background, you’ll want to save your image in a format that supports transparency. PNG is the most common choice for web graphics, while PSD preserves all your layers for future editing. JPEG does not support transparency, so if you save as JPEG, the background will appear white or black.

    To save as PNG:

    1. Go to File > Export > Export As.
    2. Choose PNG from the format dropdown.
    3. Make sure the Transparency checkbox is checked.
    4. Click Export.

    Common Mistakes to Avoid

    • Not zooming in: Always zoom in to 200-400% to check the edges for halos or stray pixels.
    • Using JPEG for transparent backgrounds: Remember, JPEG doesn’t support transparency. Use PNG.
    • Forgetting to refine edges: AI tools are great, but they’re not perfect. Take the time to refine edges, especially around hair.
    • Deleting pixels instead of using masks: Masks are non-destructive and give you more flexibility.

    Removing backgrounds in Photoshop doesn’t have to be intimidating. With the AI-powered tools like Select Subject and Remove Background, you can get great results in seconds. For more complex images, the Quick Selection Tool gives you the control you need. Remember to always use layer masks for non-destructive editing, and save your final image as a PNG to preserve transparency. With a little practice, you’ll be a background-removal pro in no time.

    Summary

    • Select Subject is a one-click AI tool that works best for simple backgrounds.
    • Remove Background is a one-click button in the Properties panel that creates a mask instantly.
    • Quick Selection Tool offers manual control for complex edges like hair.
    • Always use layer masks to keep your edits non-destructive.
    • Save as PNG to preserve transparency; JPEG does not support it.

    FAQ

    Q: Can I use these methods in older versions of Photoshop?
    A: Select Subject was introduced in Photoshop CC 2018, and Remove Background in CC 2021. If you have an older version, you can use the Quick Selection Tool or the Magic Wand instead.

    Q: What’s the difference between Select Subject and Remove Background?
    A: Select Subject creates a selection that you can refine or mask. Remove Background directly creates a layer mask. Both are AI-powered, but Remove Background is more automated.

    Q: How do I fix rough edges after using an AI tool?
    A: Use the Select and Mask workspace. You can smooth, feather, or use the Refine Edge brush to improve the selection.

    Q: Can I use Photoshop to remove backgrounds from images with transparent objects?
    A: Yes, but it’s tricky. You may need to use manual tools and refine the edges carefully. The AI tools might not handle transparency well.

    Q: Is there a free alternative to Photoshop for background removal?
    A: Yes, there are online tools like Remove.bg and Canva, but they offer less control. Photoshop gives you the highest quality results, especially for complex images.